Card Payment Web Portal
Create a Card Payment Web Portal
Card Payment Variables to Define
- Card Details
- Cardholder Name
- Variable: cardholder-name
- Label: Cardholder Name
- Description: The name of the cardholder.
- Card Number
- Variable: card-number
- Label: Card number
- Description: The Primary Account Number (PAN).
- Card Expiration Date
- Variable: card-expiration-date
- Label: Expiration Date
- Description: The card expiration date.
- Card Security Code
- Variable: card-security-code
- Label: Card Security Code
- Description: The card security code.
- Amount
- Variable: amount
- Label: Amount
- Description: The amount of the payment
- Cardholder Name
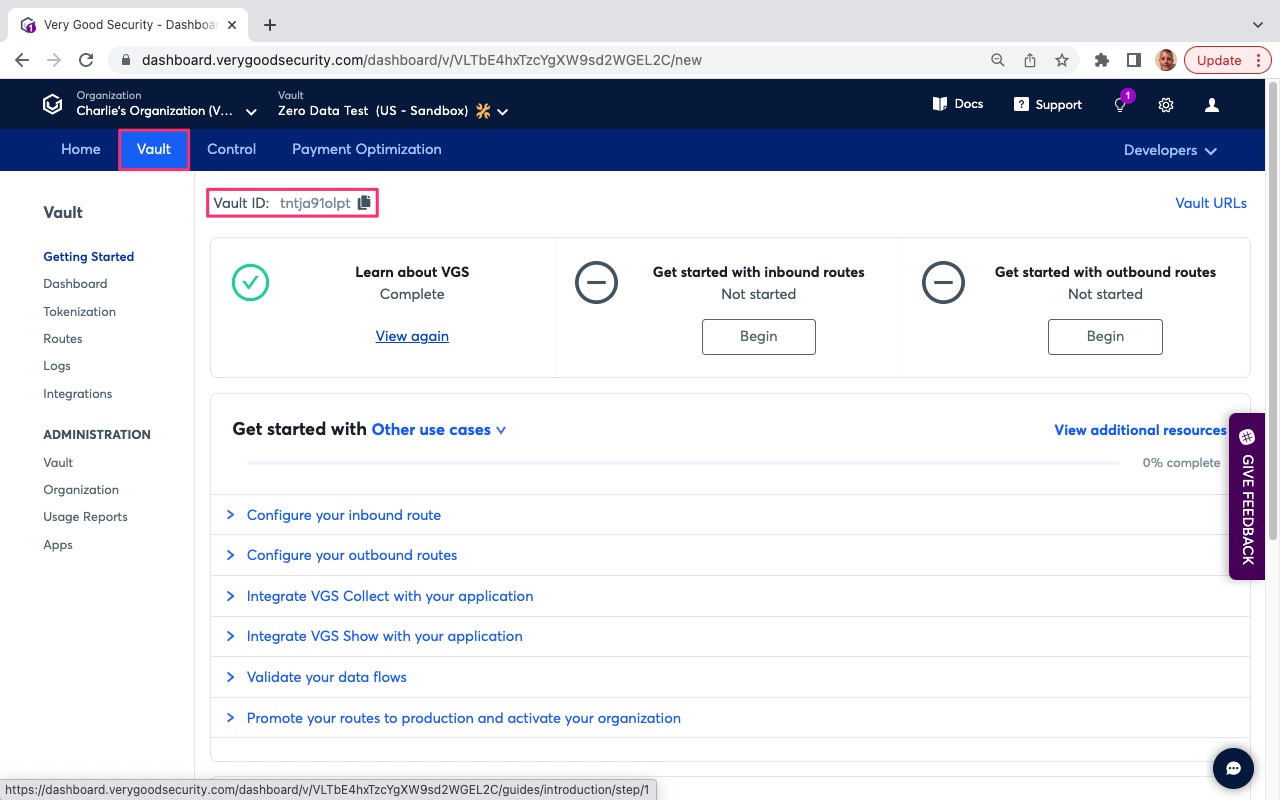
Record the VGS Data Vault ID
- Log into your VGS Dashboard (https://dashboard.verygoodsecurity.com).
- On the top, left-hand side, just under the organization name, click on the “Vault” tab.
- On the top, left-hand side, just below the “Vault” tab, record/copy your VGS “Vault ID”.
- The following picture highlights, with red boxes, the areas to select/modify in steps #2 and #3.
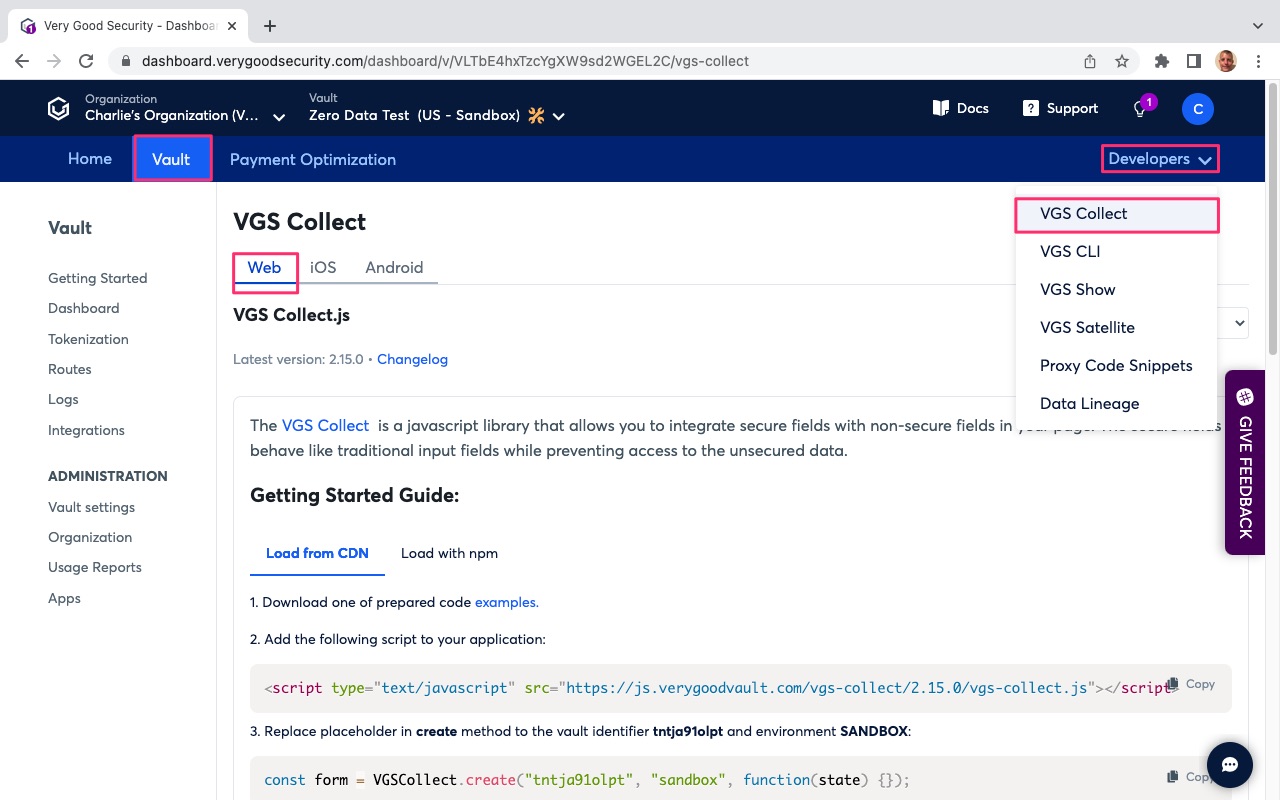
Access the VGS Collect.js Form Builder
-
If not already logged in, log into your VGS Dashboard (https://dashboard.verygoodsecurity.com).
-
Go to the Developer dropdown (top, right-hand side of VGS Dashboard).
-
Select “VGS Collect”.
-
Click on the “Web” tab below “VGS Collect” title at the top.
-
The following picture highlights, with red boxes, the areas to select/modify in steps #2 through #4.
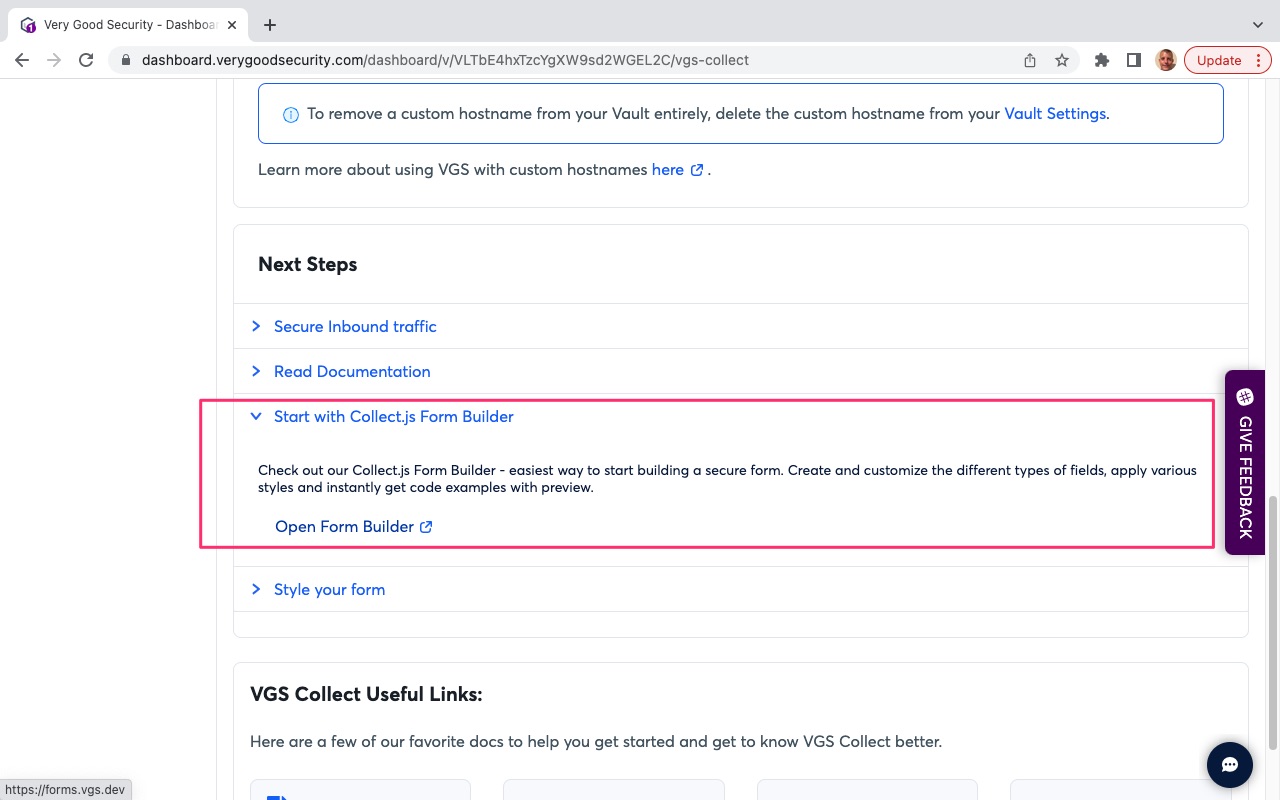
- Scroll to the bottom of the page.
- Under “Next Steps”, select “Start with Collect.js Form Builder.
- Finally, click on “Open Form Builder”.
- The following picture highlights, with red boxes, the areas to select/modify in steps #5 through #7.
Build the Card Payment Web Form
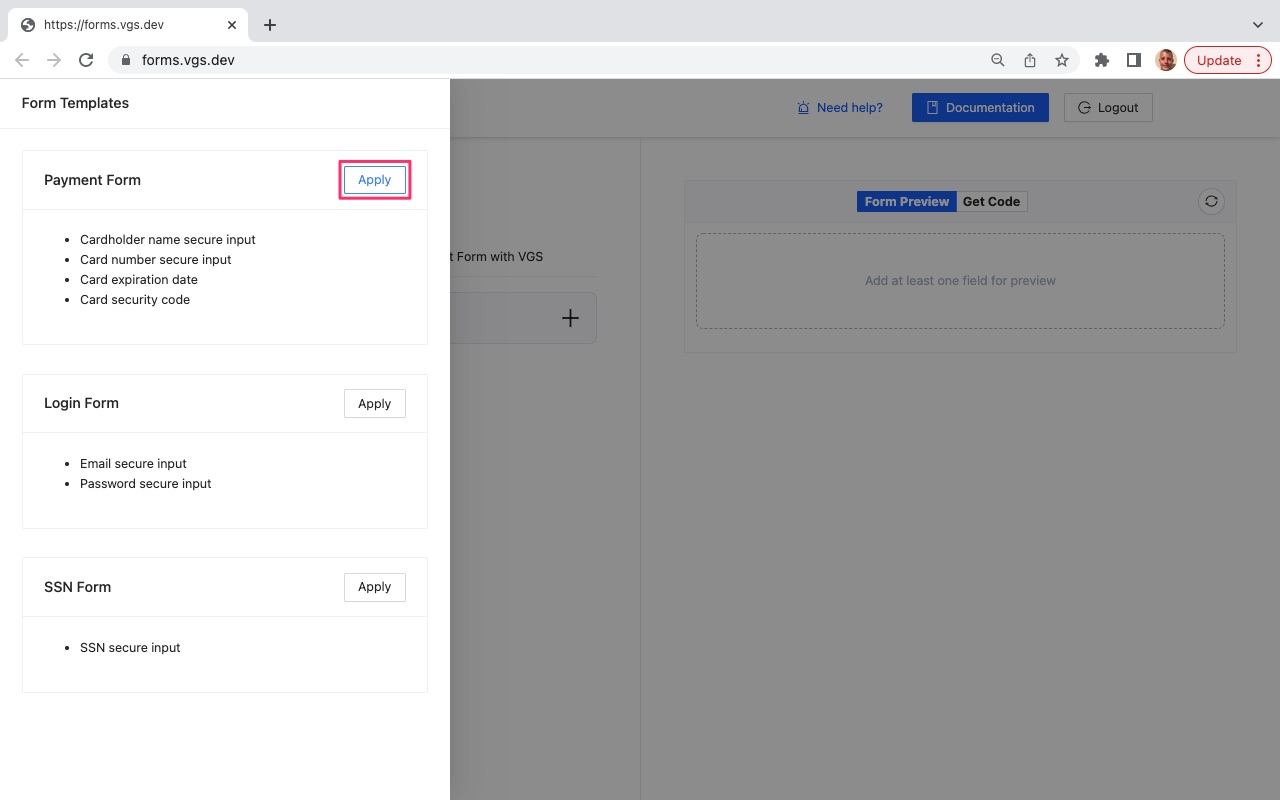
- From the left-hand pane of the VGS Collect.js Form Builder, select “Choose from template”.
- Hit “Apply” next to the “Payment Form” template.
- Click on VGS Collect.js Form Builder to exit the form template selection.
- The following picture highlights, with red boxes, the areas to select/modify in steps #1 through #3.
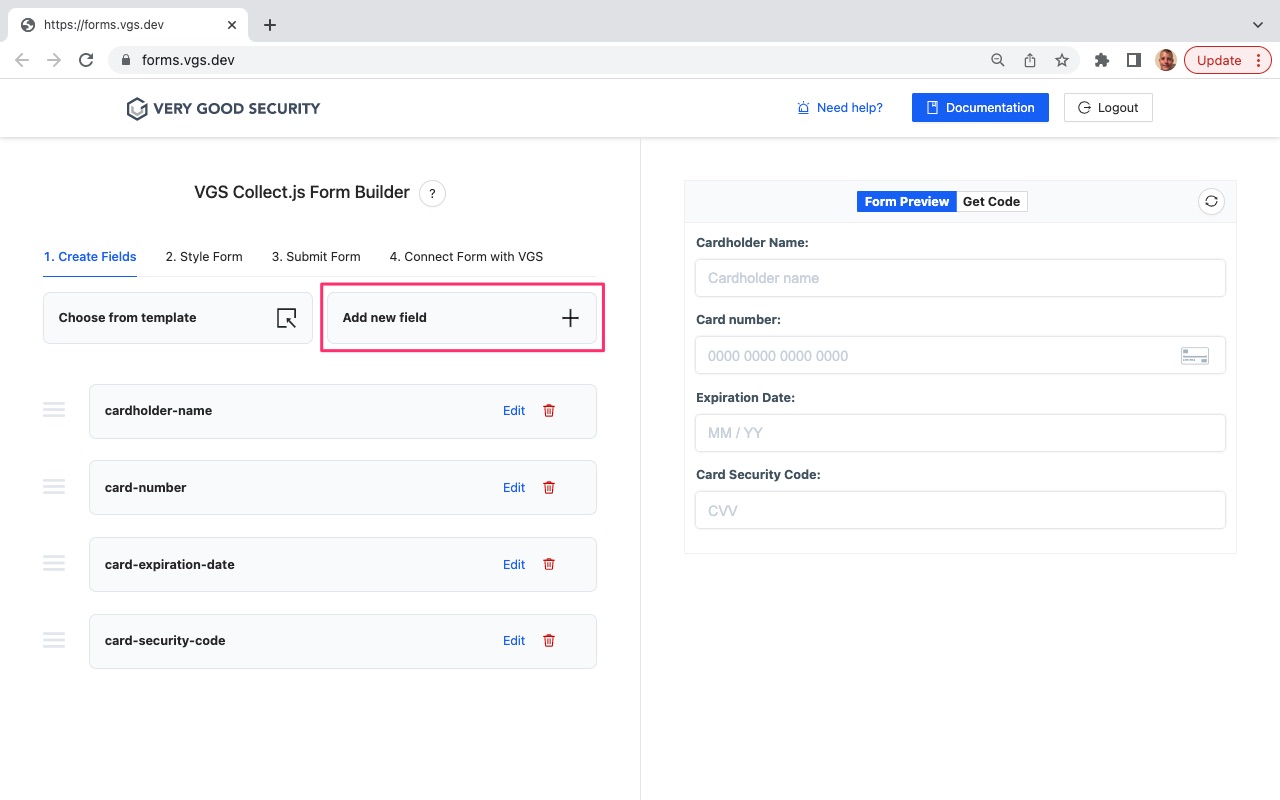
- From the left-hand pane of the VGS Collect.js Form Builder, select “Add new field”.
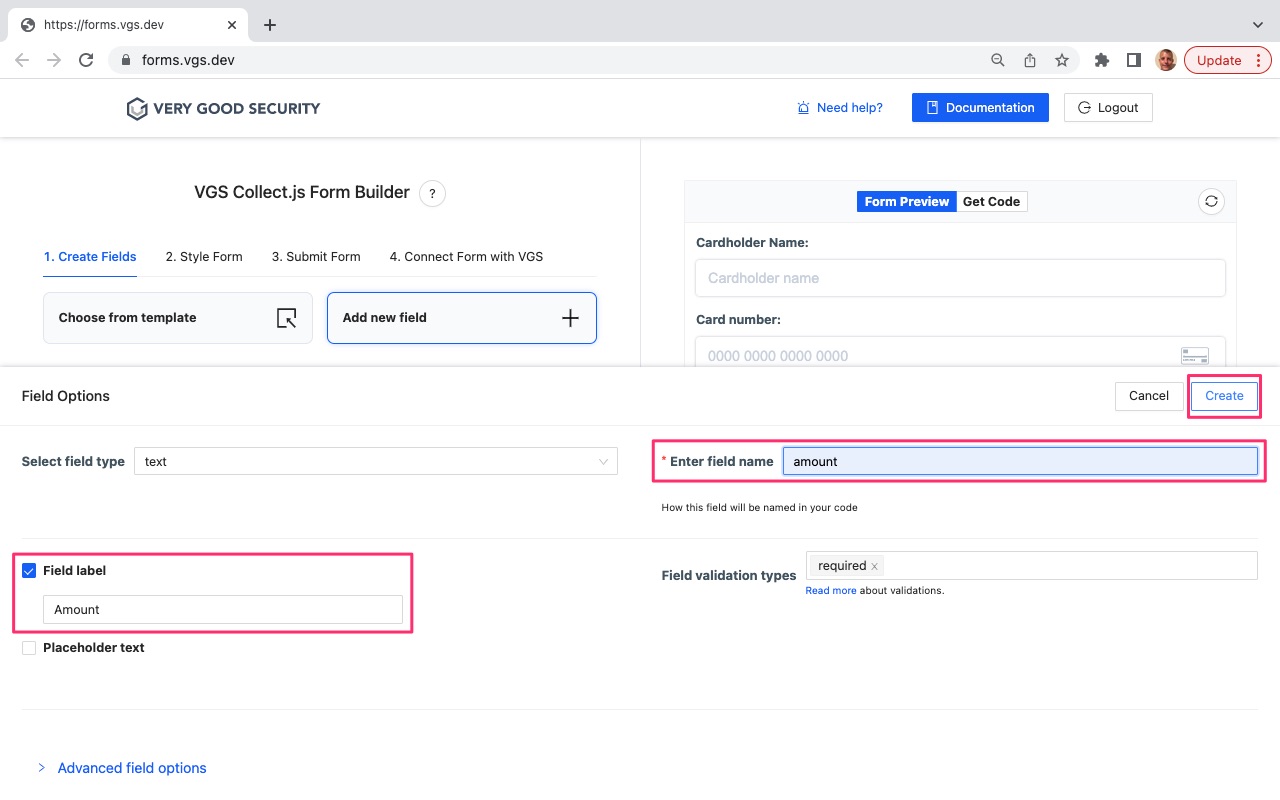
- Under Field Options on the left-hand side, check the “Field label” box and enter, “Amount” in the box provided.
- Under Field Options on the right-hand side, enter “amount” in the “Enter field name” field.
- Under Field Options on the right-hand side, hit the “Create” button.
- The following picture highlights, with red boxes, the areas to select/modify in steps #5 through #8.
- From the right-hand pane of the VGS Collect.js, select “Form Preview”.
- You should now see 5 fields to capture the card payment.
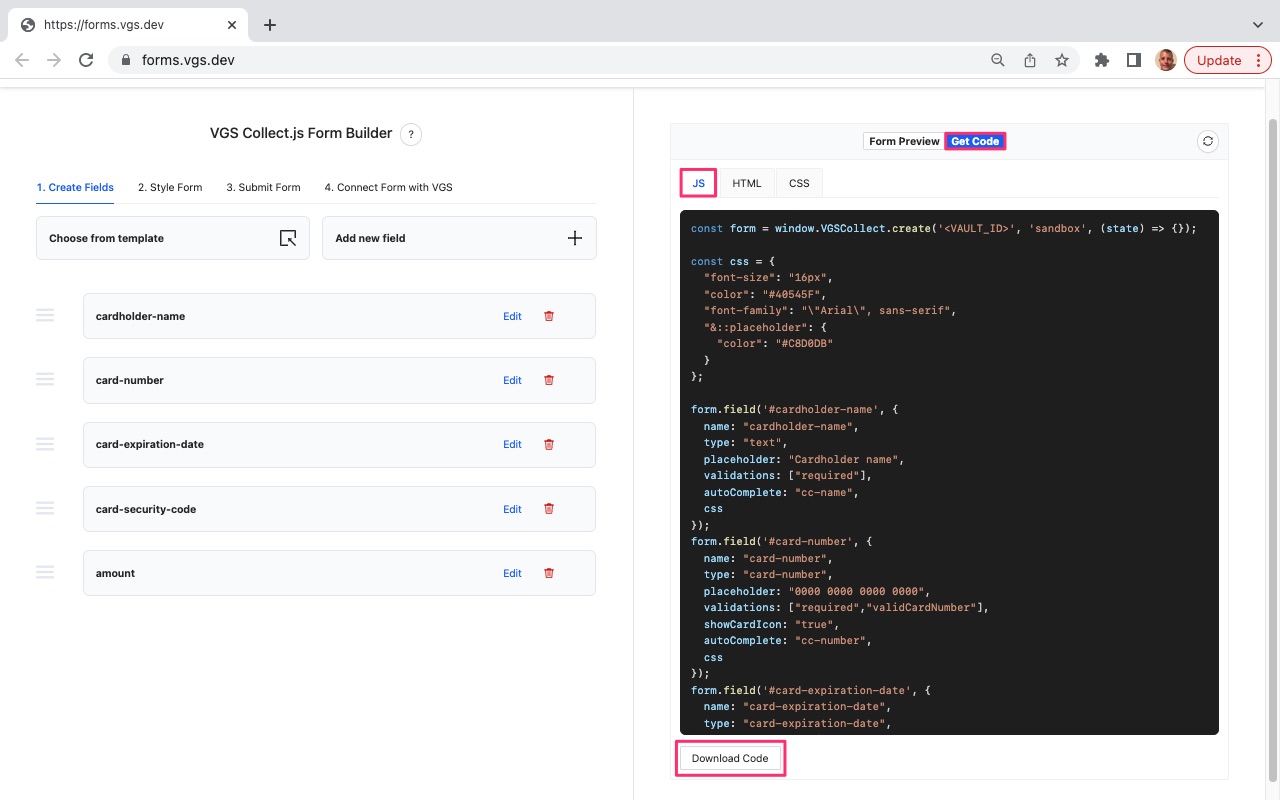
- From the right-hand pane of the VGS Collect.js Form Builder, select “Get Code”.
- You will see the following file types:
- JS (form.js) = The Javascript code contain the VGS Collect form creation and iFrames defined.
- HTML (index.html) - The HTML used to present the form.
- CSS (styles.css) - Contains CSS to style the form.
- From the right-hand pane of the VGS Collect.js Form Builder, click on the “JS” tab.
- Scroll to the bottom.
- Hit “Download Code” to download the 3 files.
- The following picture highlights, with red boxes, the areas to select/modify in steps #12 and #16.
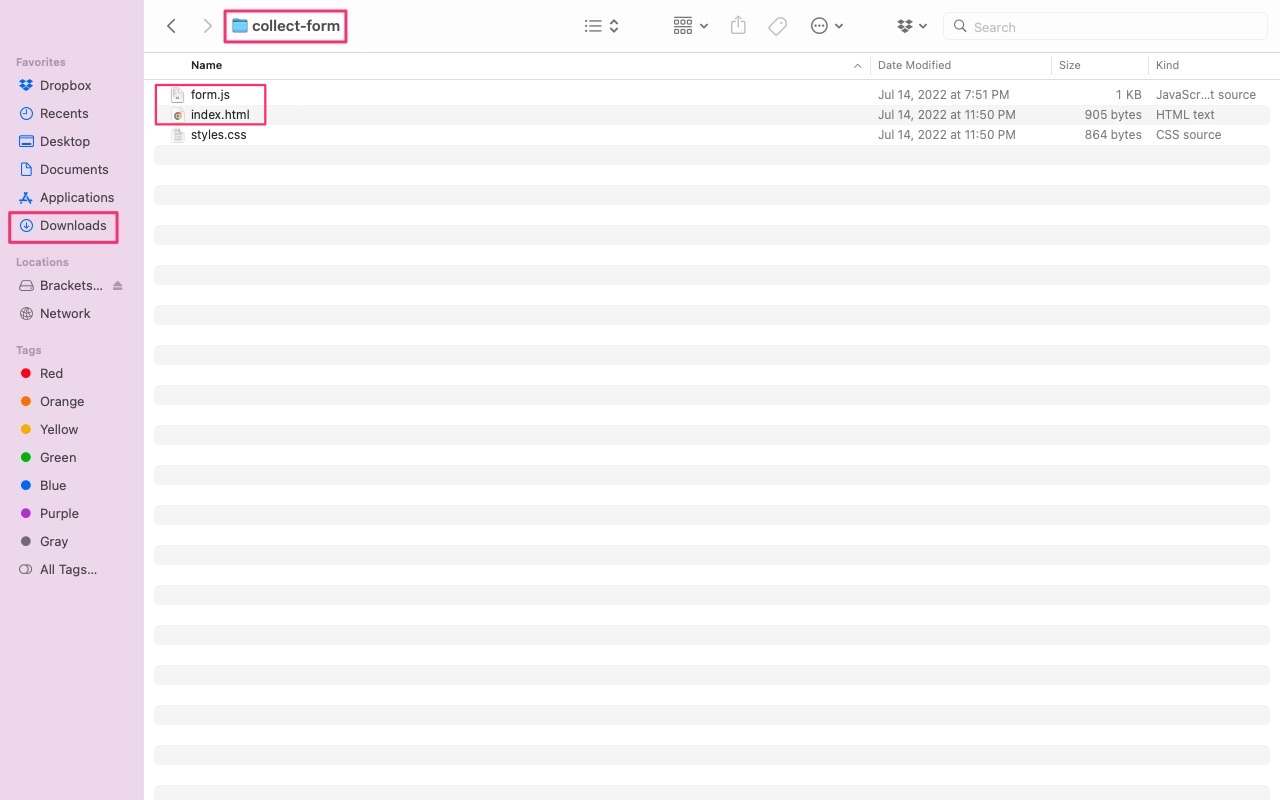
- Go to the “Download” folder on your local machine and locate the newly downloaded directory starting with “collect-form” and open it.
- Edit the “form.js” file.
- The following pictures highlights, with red boxes, the areas to select/modify in steps #18 and #19.
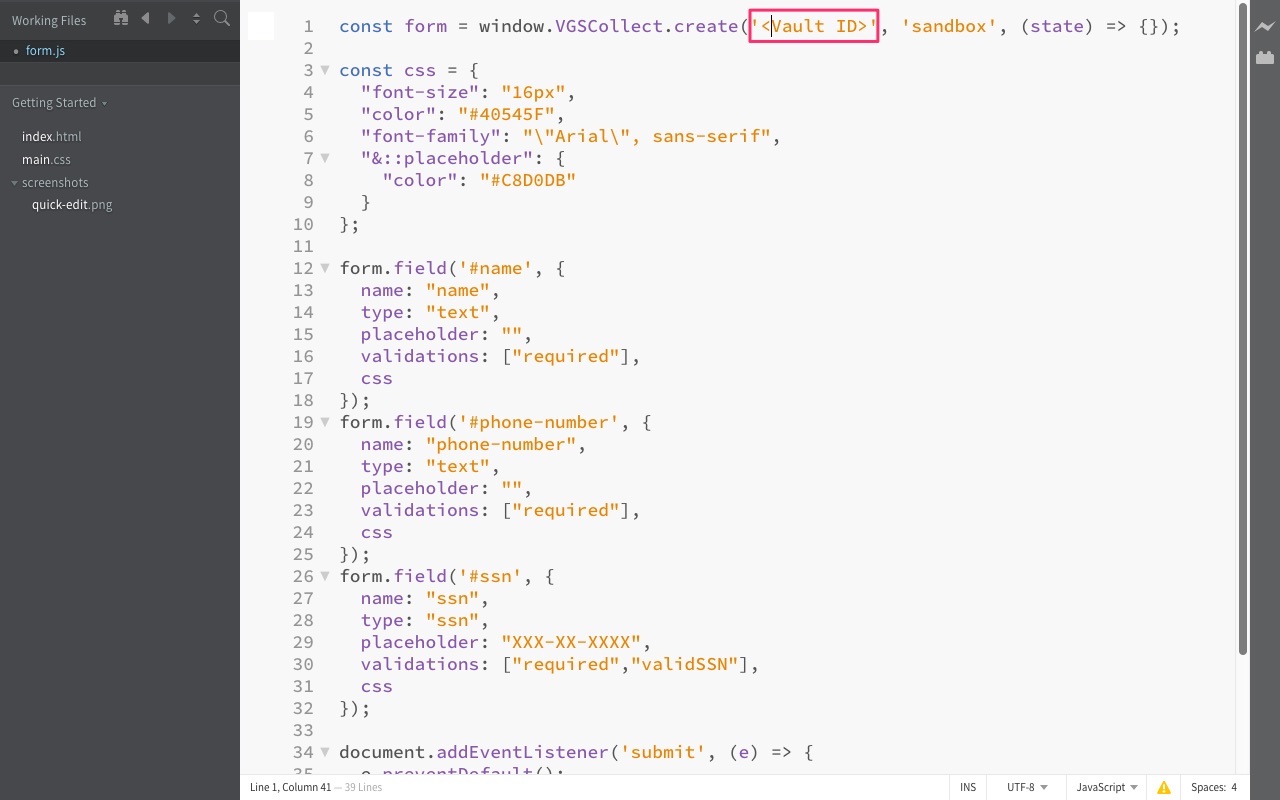
- Replace the ‘<Vault ID>’ with your VGS Data Vault ID recorded earlier.
- The following pictures highlights, with red boxes, the areas to select/modify in step #21.
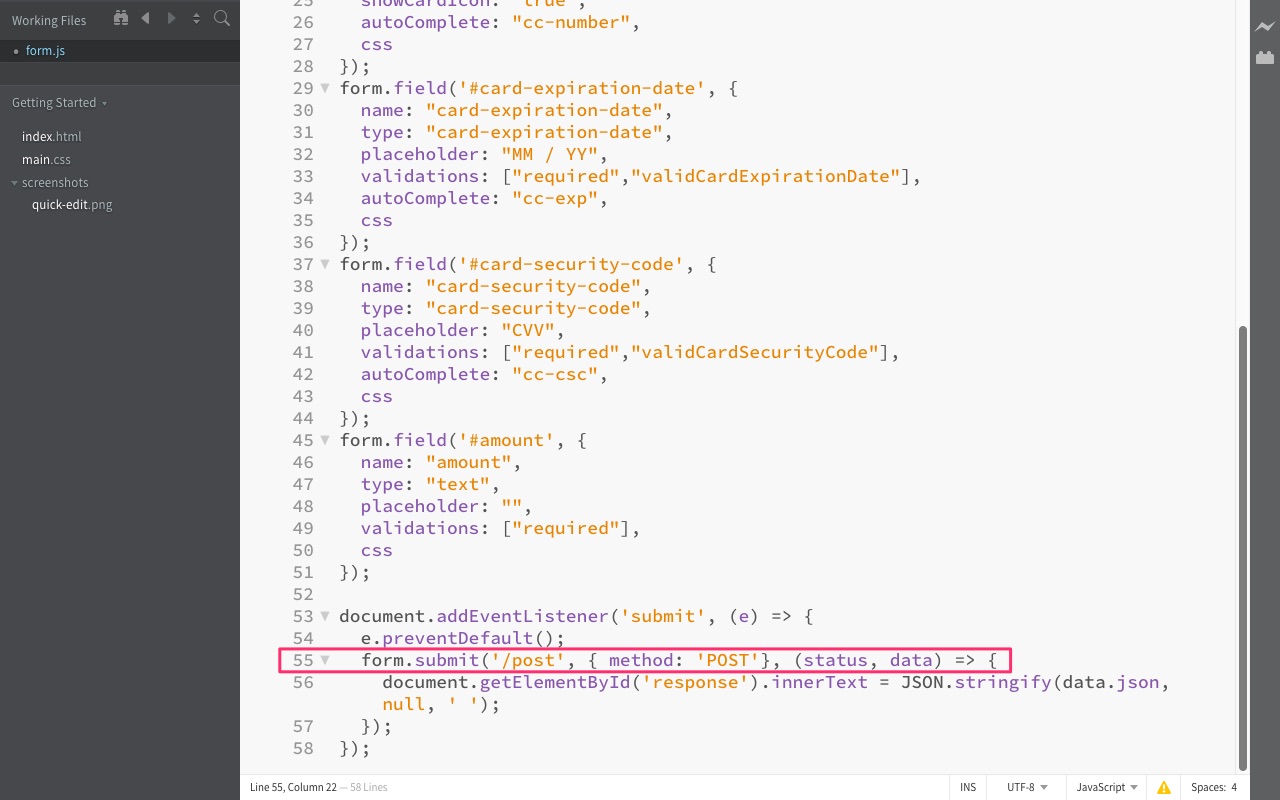
- Go to the bottom of the “form.js” file. The following code block and highlighted area is the form submit and denotes the destination API endpoint:
- Save the file.
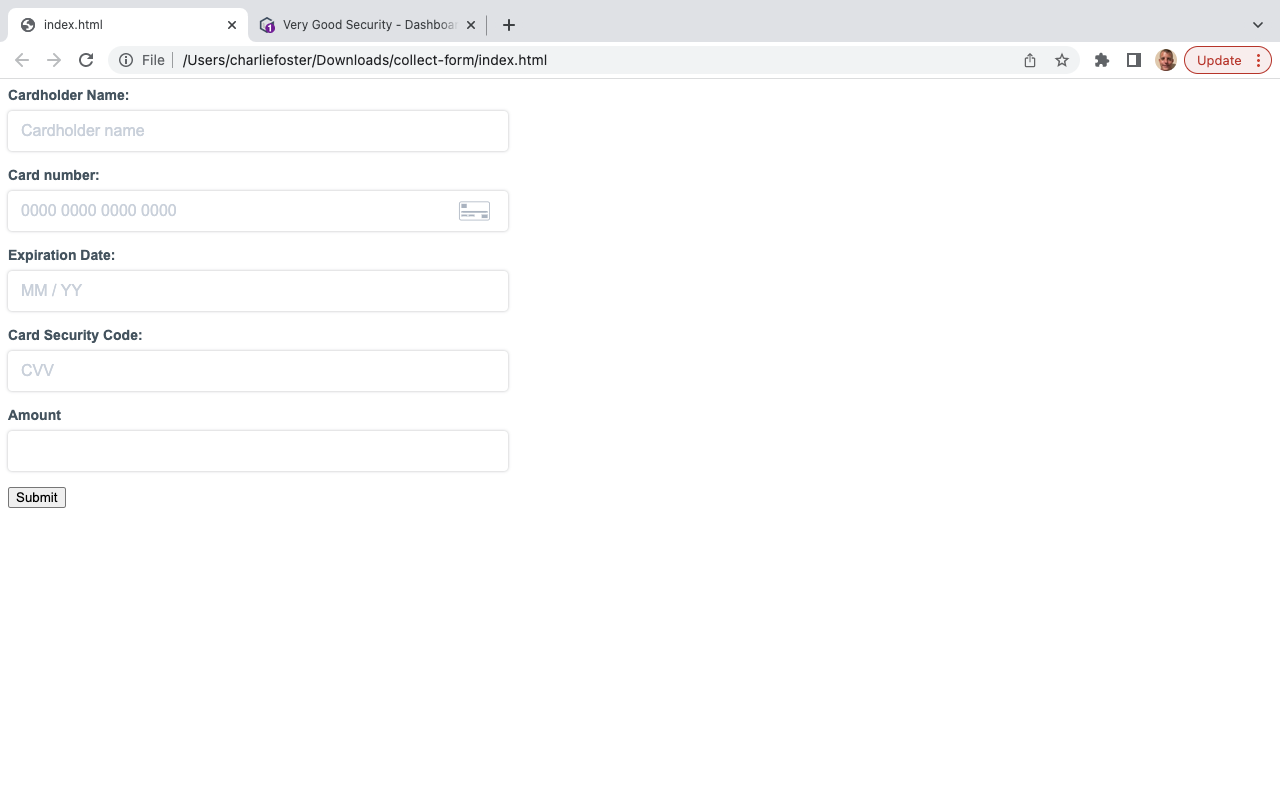
- Double-click on the “index.html” file to launch the Card Payment Web Portal.
- The following picture provides an illustration of the Card Payment Web Portal launched in step #26.
Please note that you just created a web portal (client-side application) that is descoped from the PCI-sensitive data.
Also note that we only leveraged step #1 of the VGS Collect.js Form Builder to create a form. As part of this lab, we are walking through some steps manually. Steps #2 - #4 enable you to style the form (step #2; if planning on leverage in real environment), define the server-side API endpoint to hit (step #3), and automatic creation of the VGS Data Vault and Inbound Route (step #4;). We will manually create an Inbound Route in the next section.
Congratulations, you have finished this section.