Create Outbound Routes to 3rd-parties
Create Outbound Routes to Each 3rd-party
3rd-party (KYC/AML/ID Verification)
- If not already logged in, log into your VGS Dashboard (https://dashboard.verygoodsecurity.com).
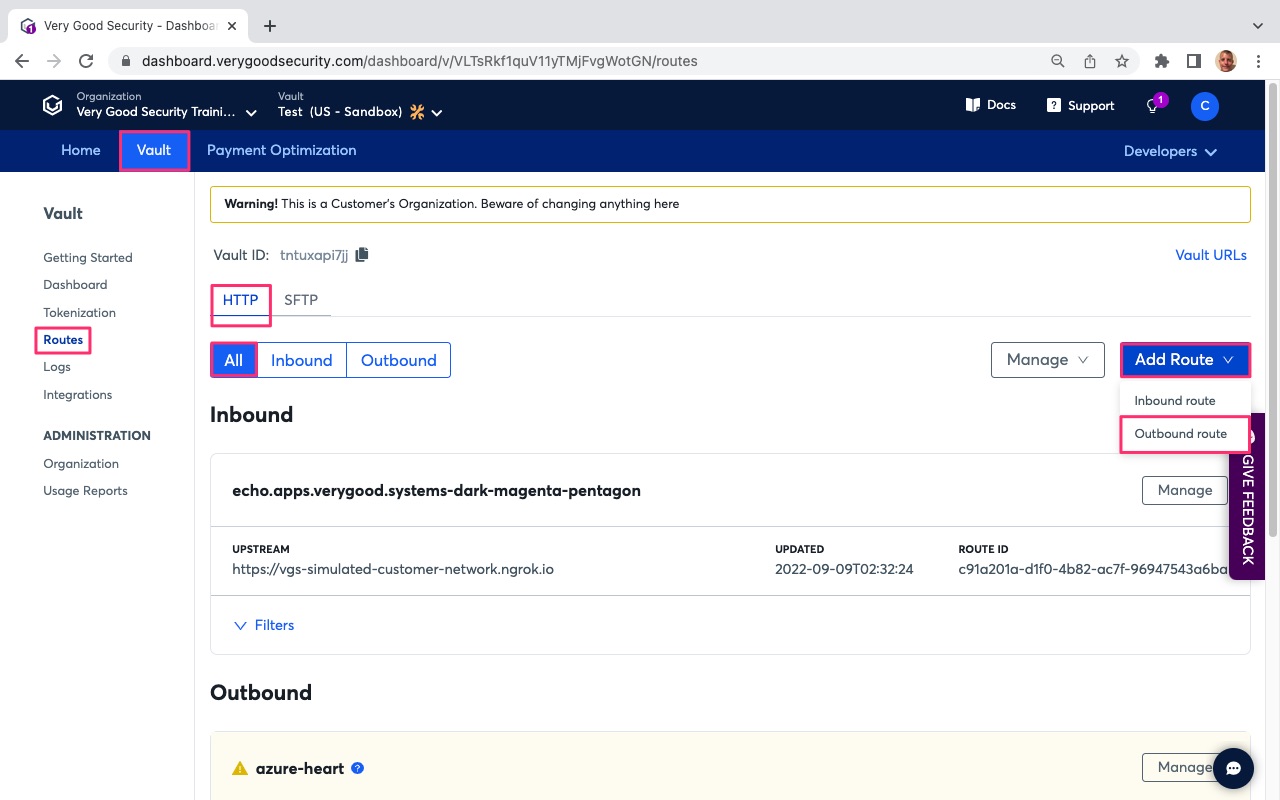
- On the top, left-hand side, just under the organization name, click on the “Vault” tab.
- On the left-hand side, under “Vault”, click on “Routes”.
- At the top, just under the “Vault ID”, select the “HTTP” tab.
- Under the “HTTP” tab, select the “All” tab.
- On the right-hand side, click on “Add Route” and select “Outbound route”.
- The following picture highlights, with red boxes, the areas to select/modify in steps #2 through #6.
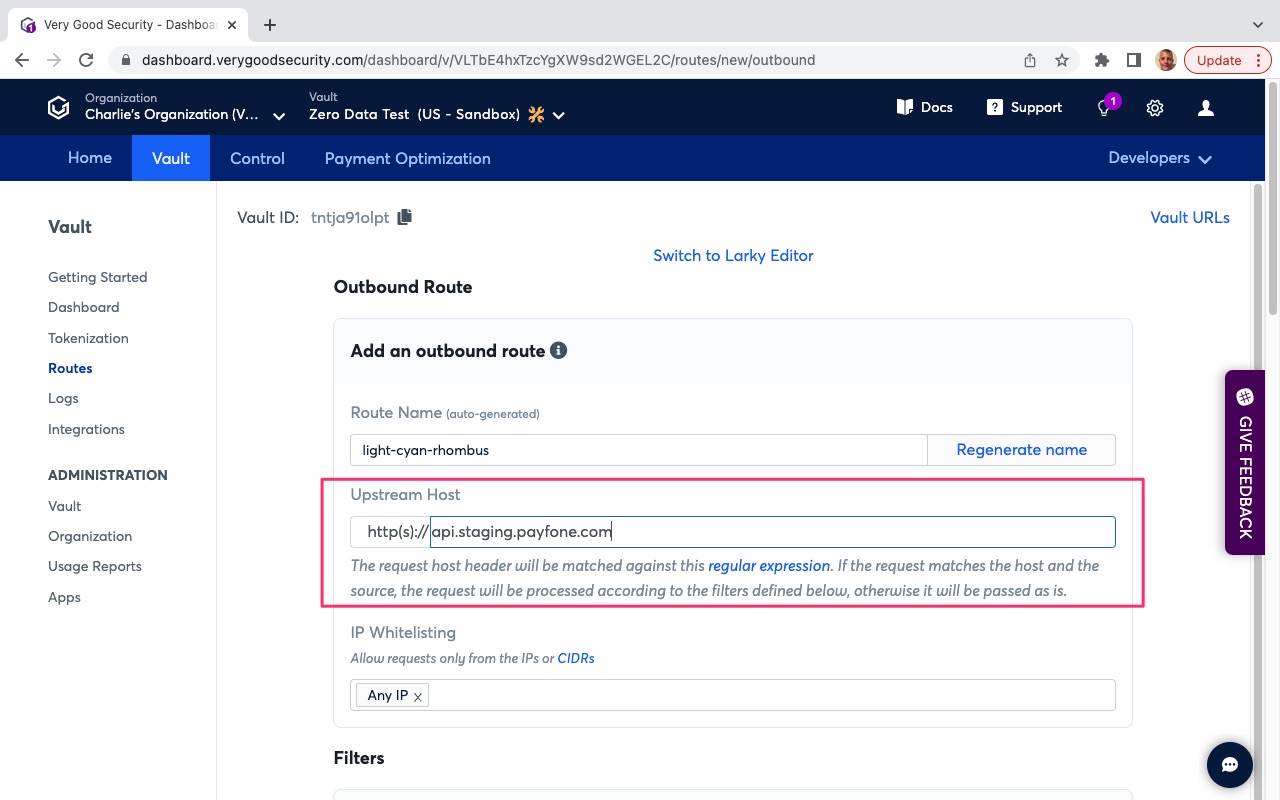
- Under Upstream Host, modify the Upstream Host to point to Prove’s base API endpoint (https://api.staging.payfone.com).
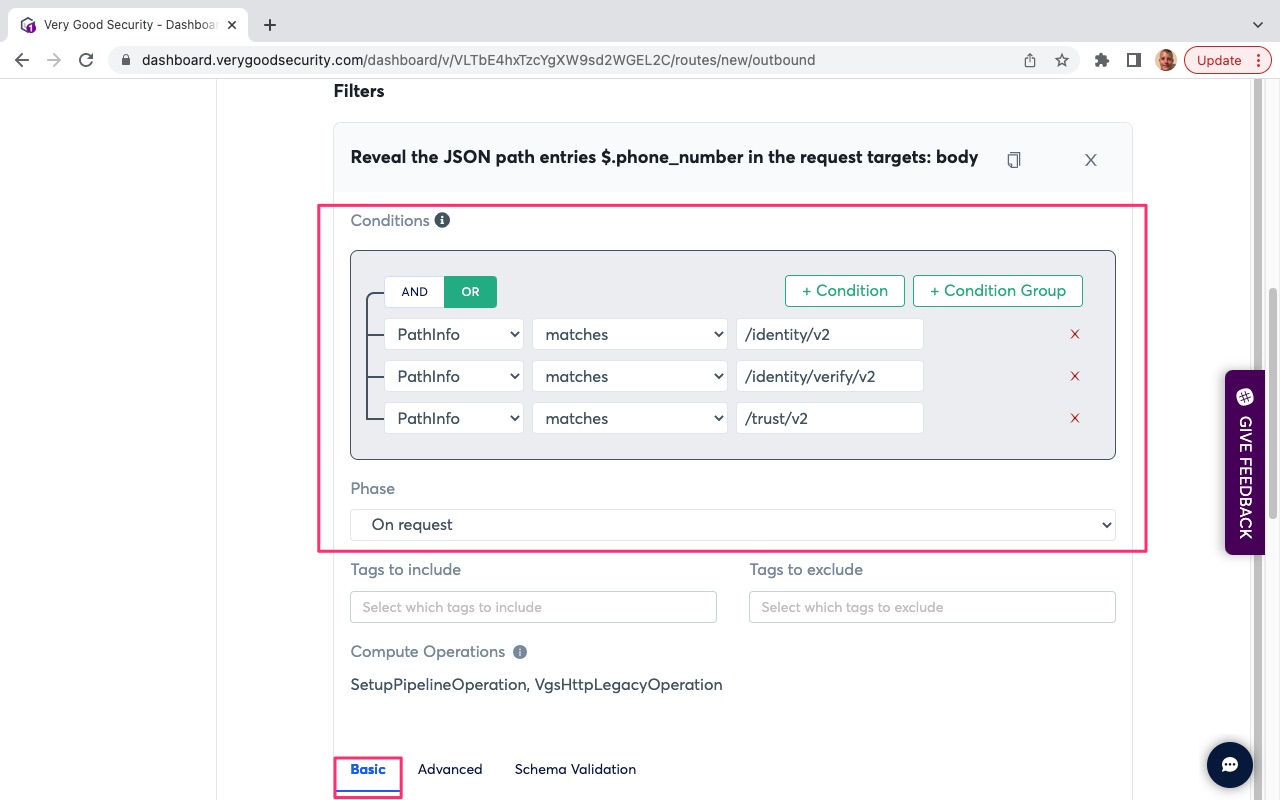
- Scroll down to “Filters”.
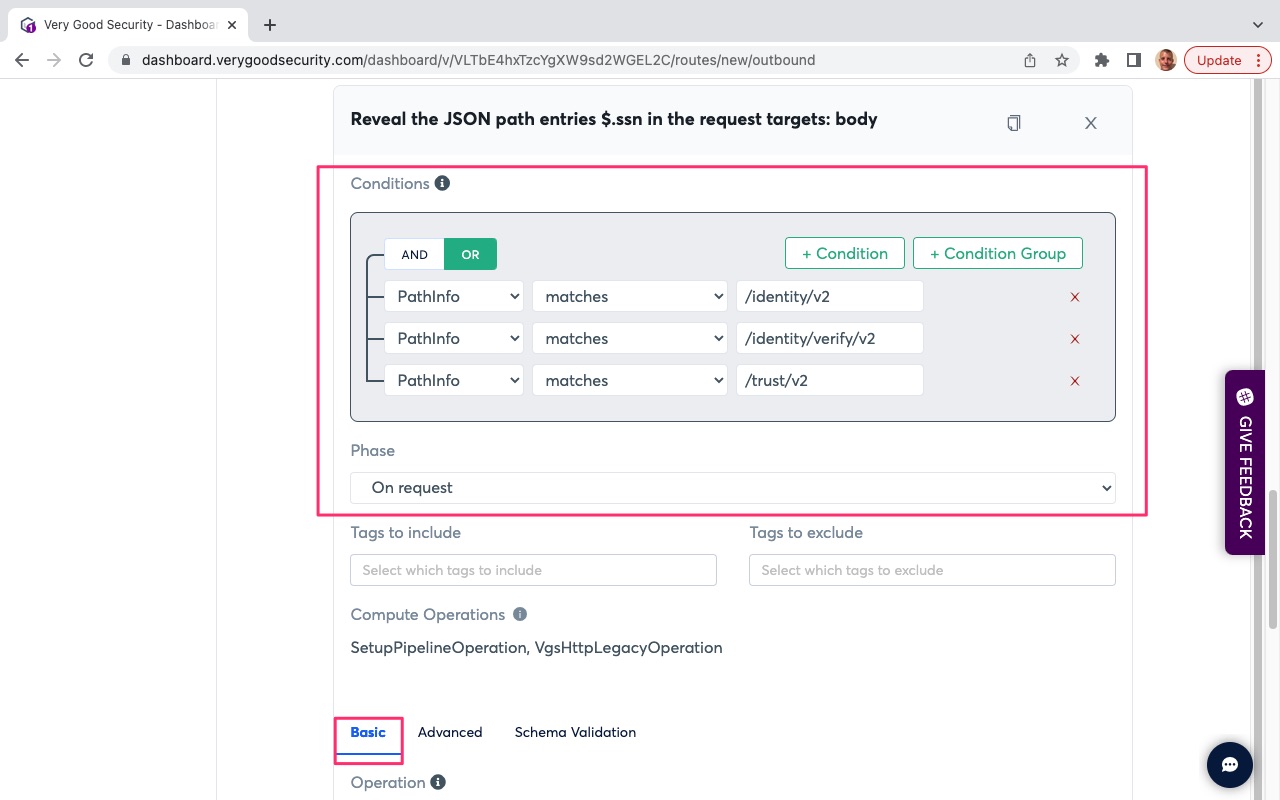
- Under “Conditions” in the default filter, set an OR condition with the following settings:
* PathInfo matches “/identity/v2”. This points to your server-side API endpoint destination.
or
* PathInfo matches “/identity/verify/v2”. This points to your server-side API endpoint destination.
or
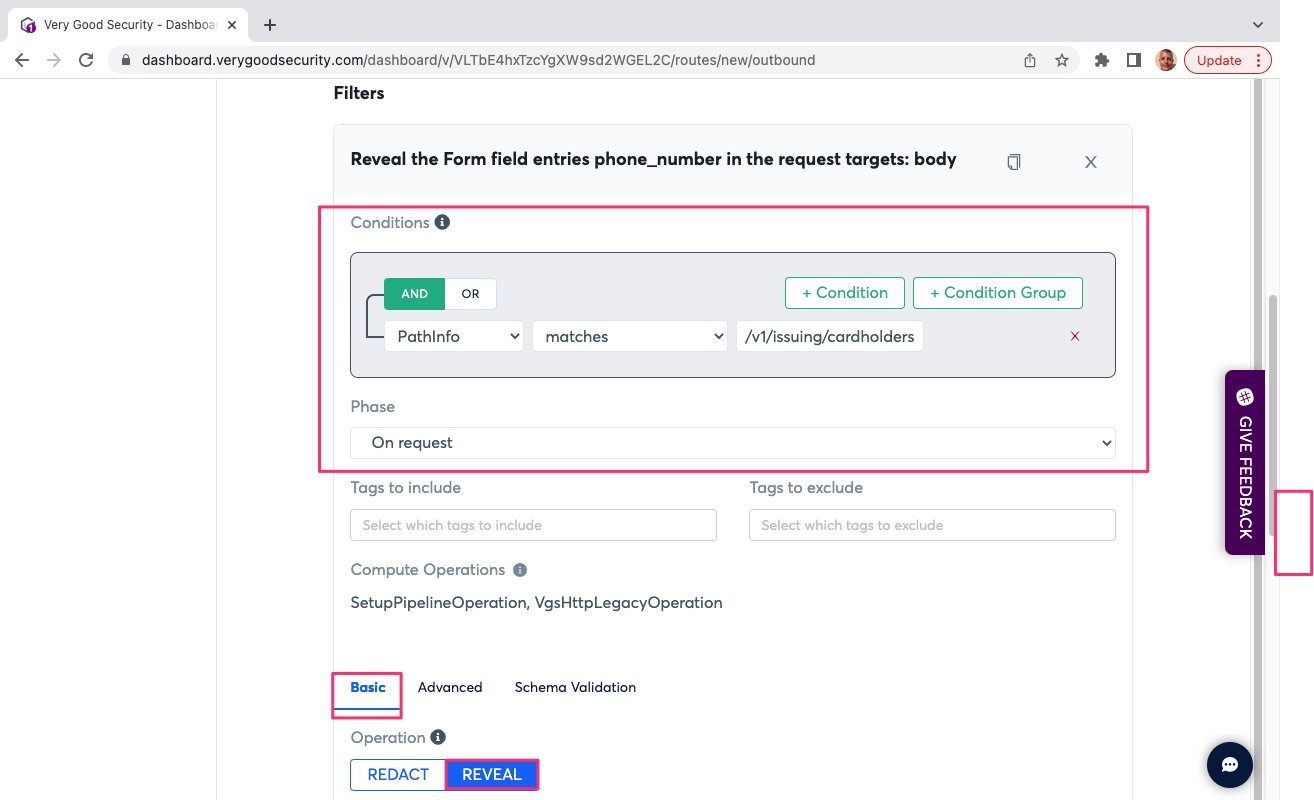
* PathInfo matches “/trust/v2”. This points to your server-side API endpoint destination. - Phase: “On request”. This defines the API phase. In this case, this filter will trigger on initial API call.
- Scroll down and select the “Basic” tab below “Tag”.
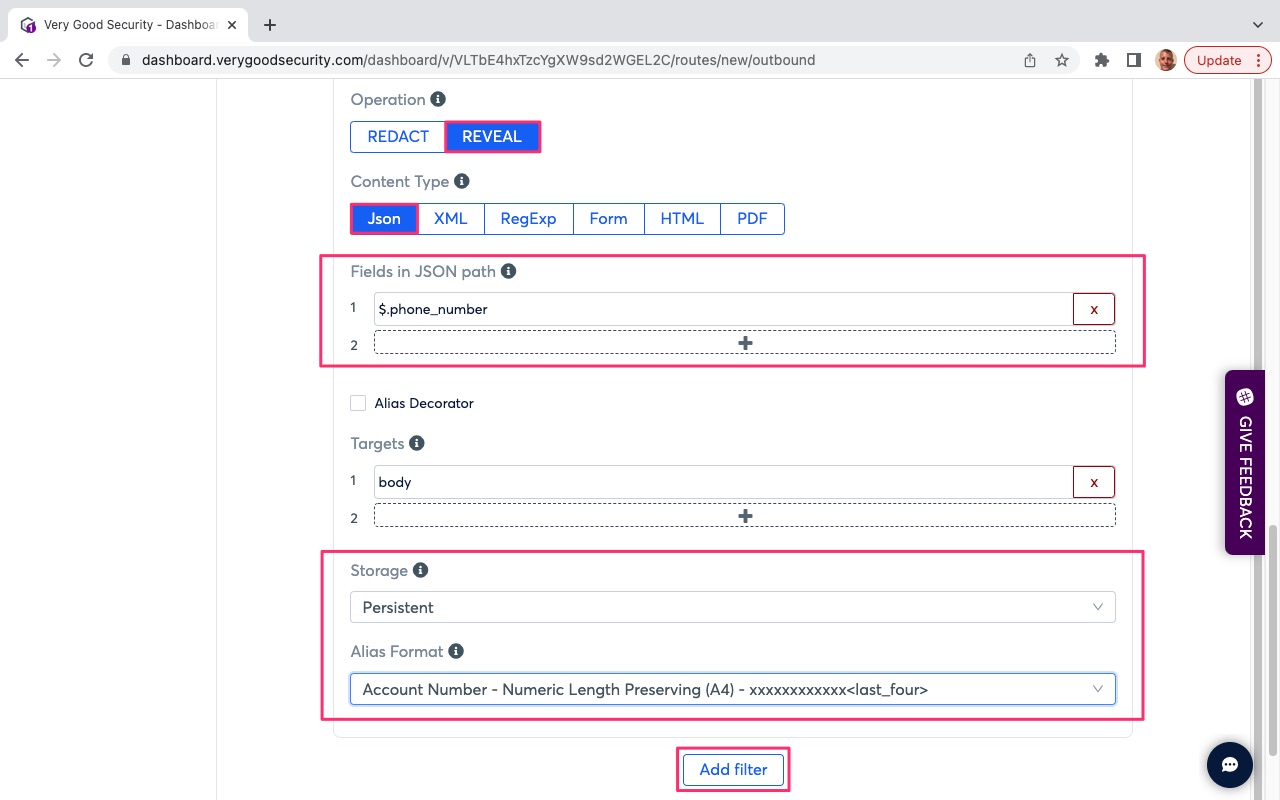
- Under “Operation”, select “REVEAL” to reveal the sensitive data alias.
- Under “Content Type, select “Json” to identify the content type of the request.
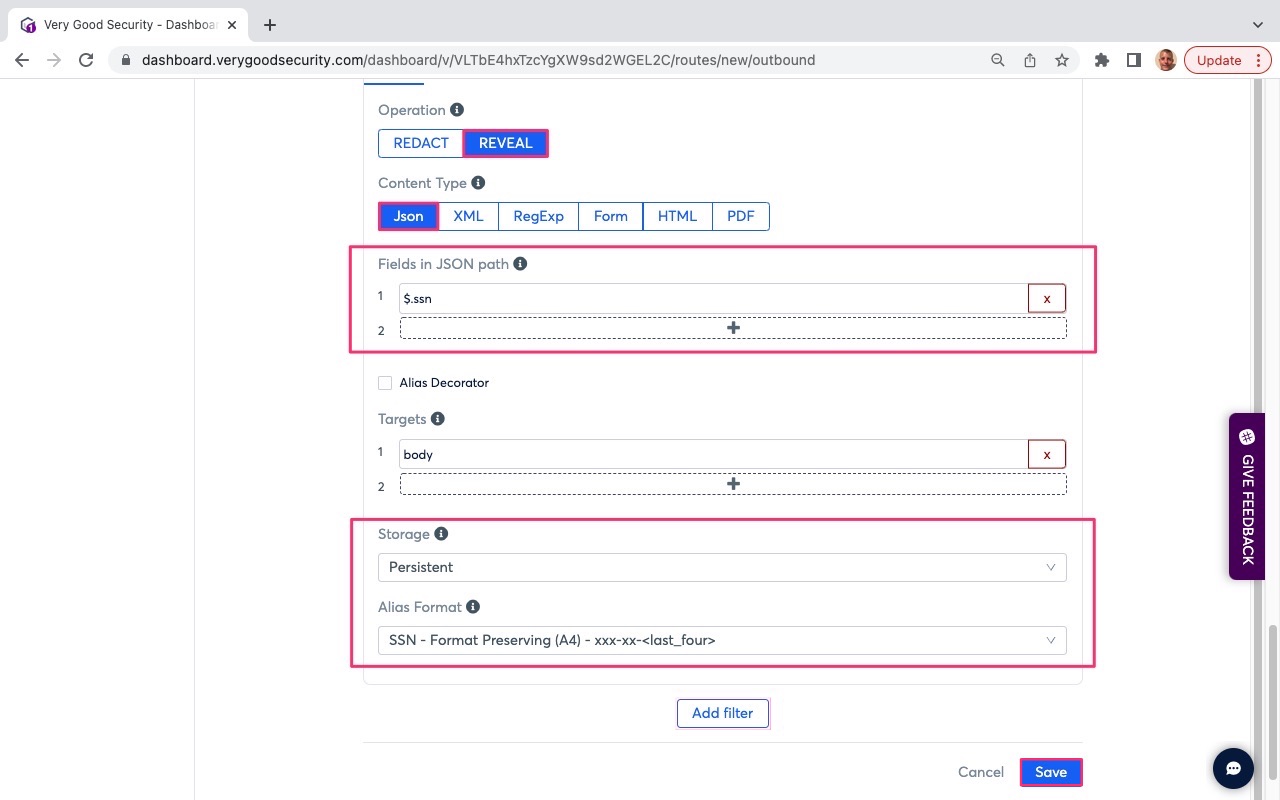
- Under “Fields in JSON path”, enter “$.phoneNumber” into field 1.
- Scroll down to “Storage” below “Targets”.
- Click on “Storage” field and select “Persistent”.
- Under “Alias Format”, click the field and select “Account Number - Number Length Preserving (A4) - xxxxxxxxxxxx.
- The following pictures highlights, with red boxes, the areas to select/modify in steps #8 through #18.
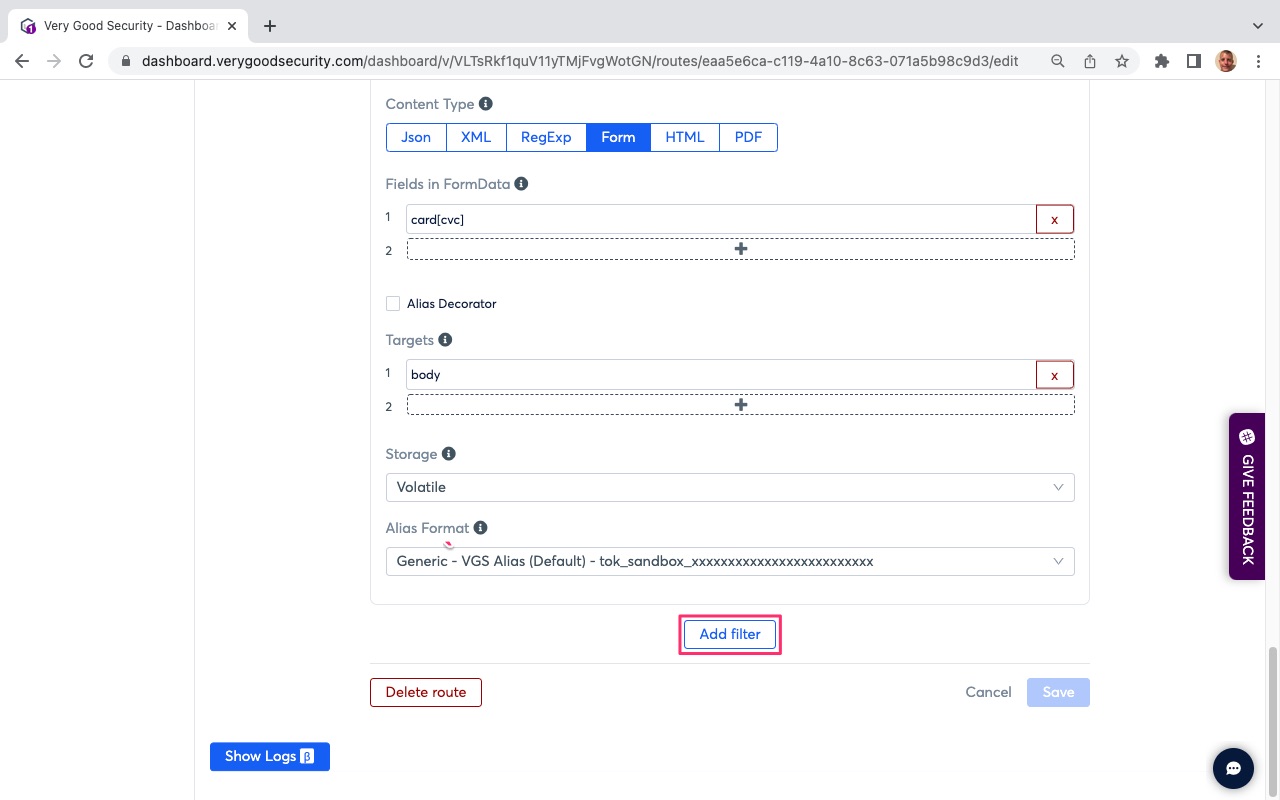
- Scroll down and hit “Add filter” to add the next filter.
- Under “Conditions” in the default filter, set an OR condition with the following settings:
* PathInfo matches “/identity/v2”. This points to your server-side API endpoint destination.
or
* PathInfo matches “/identity/verify/v2”. This points to your server-side API endpoint destination.
or
* PathInfo matches “/trust/v2”. This points to your server-side API endpoint destination. - Phase: “On request”. This defines the API phase. In this case, this filter will trigger on initial API call.
- Scroll down and select the “Basic” tab below “Tag”.
- Under “Operation”, select “REVEAL” to reveal the sensitive data alias.
- Under “Content Type, select “Json” to identify the content type of the request.
- Under “Fields in JSON path”, enter “$.ssn” into field 1.
- Scroll down to “Storage” below “Targets”.
- Click on “Storage” field and select “Persistent”.
- Under “Alias Format”, click the field and select “SSN - Format Preserving (A4) - xxx-xx-.
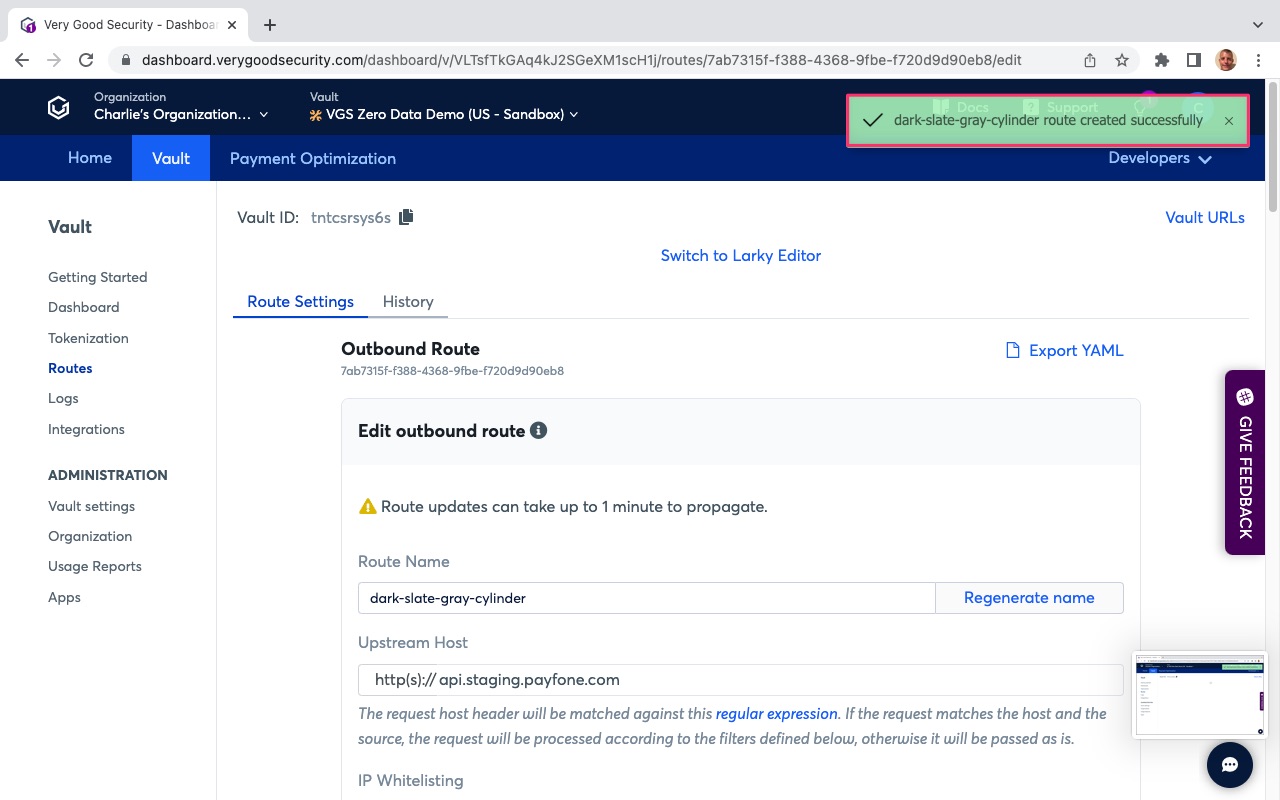
- Scroll to the bottom and hit “Save” in the bottom, right-hand side.
- Check for successful route update message in green.
- The following pictures highlights, with red boxes, the areas to select/modify in steps #20 through #31.
3rd-party (Card Issuance)
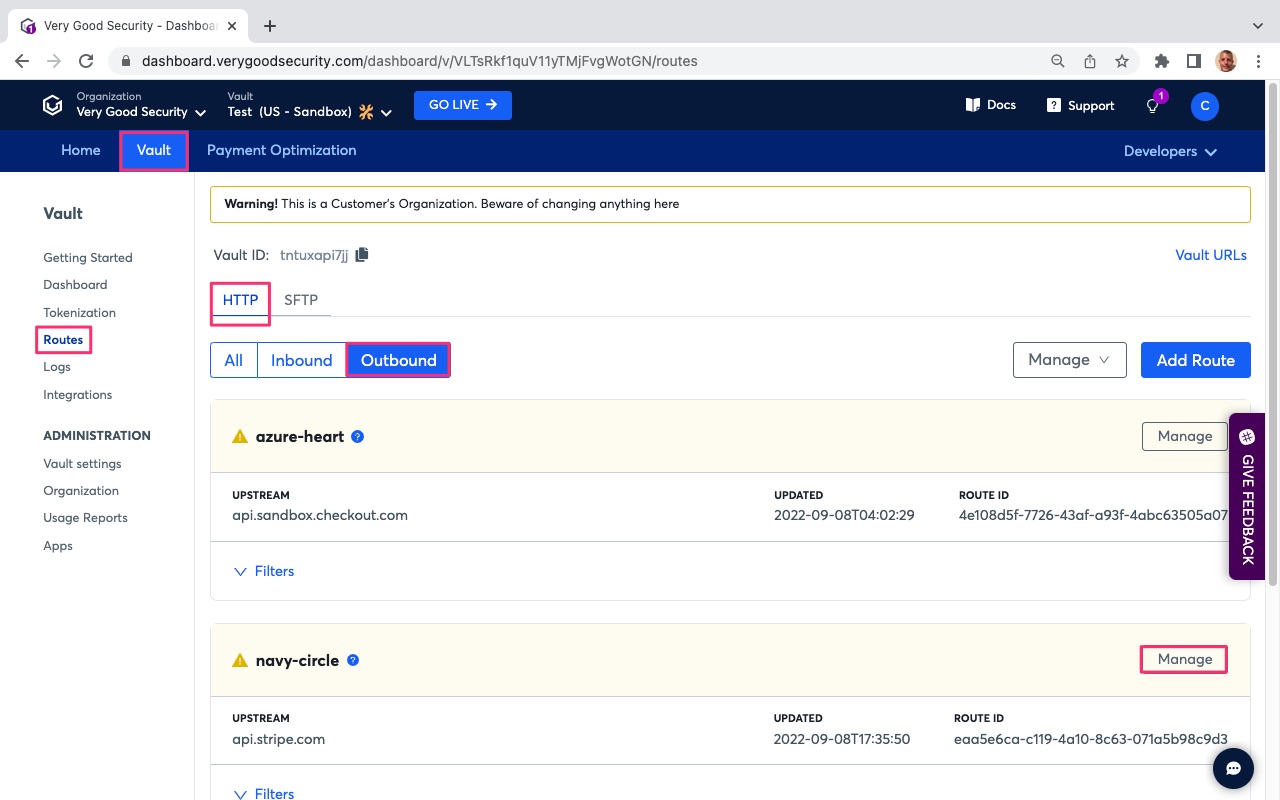
- On the top, left-hand side, just under the organization name, click on the “Vault” tab.
- On the left-hand side, under “Vault”, click on “Routes”.
- At the top, just under the “Vault ID”, select the “HTTP” tab.
- Under the “HTTP” tab, select the “Outbound” tab.
- Scroll down to the outbound route with UPSTREAM set to “api.stripe.com”.
- On the right-hand side, click on “Manage”.
- The following picture highlights, with red boxes, the areas to select/modify in steps #1 through #6.
- Under Upstream Host, review the setting pointing to Stripe’s base API endpoint (https://api.stripe.com).
- Scroll down to the bottom of the page.
- Hit “Add filter” to add the next filter.
- Under “Conditions” in the default filter, set the following:
* PathInfo matches “/v1/issuing/cardholders”. This points to your server-side API endpoint destination. - Phase: “On request”. This defines the API phase. In this case, this filter will trigger on API call response.
- Scroll down and select the “Basic” tab below “Tag”.
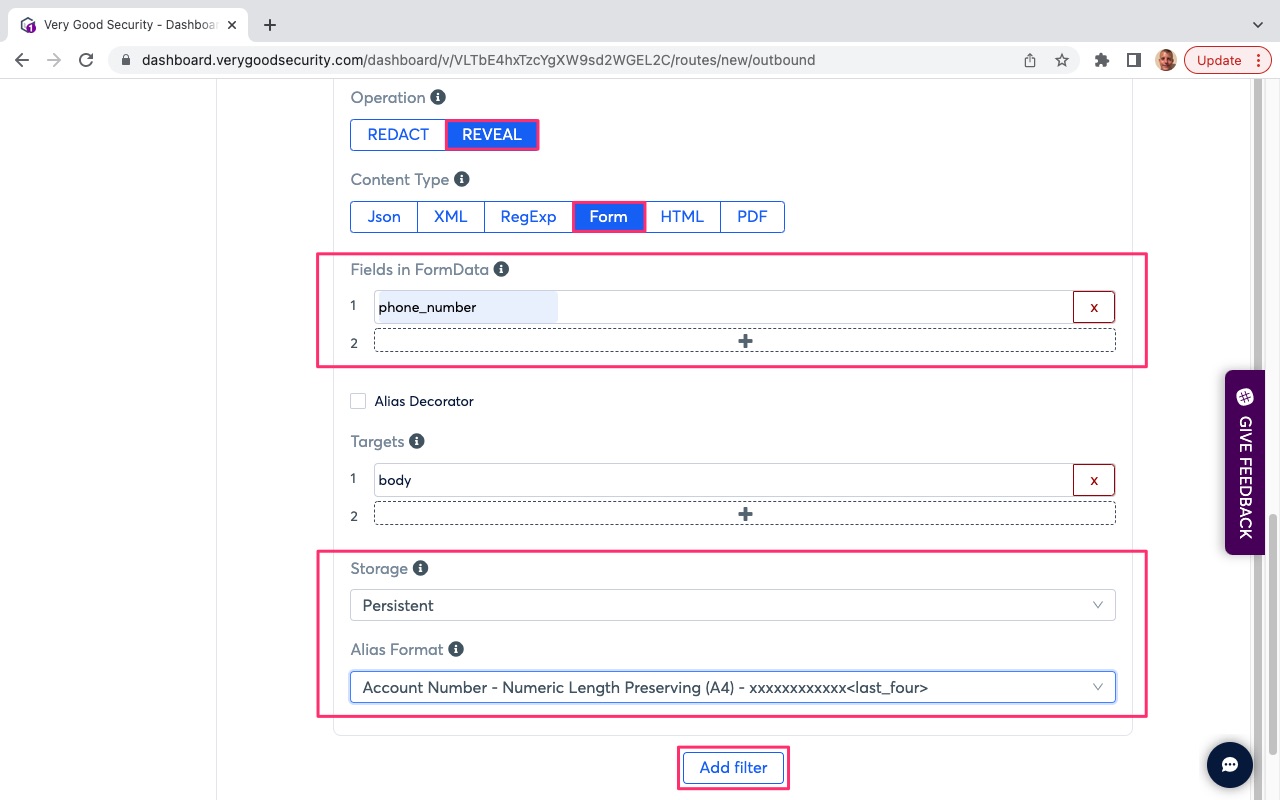
- Under “Operation”, select “REVEAL” to reveal the sensitive data alias.
- Under “Content Type, select “Form” to identify the content type of the request.
- Under “Fields in JSON path”, enter “phone_number” into field 1.
- Scroll down to “Storage” below “Targets”.
- Click on “Storage” field and select “Persistent”.
- Under “Alias Format”, click the field and select “Account Number - Number Length Preserving (A4) - xxxxxxxxxxxx.
- The following pictures highlights, with red boxes, the areas to select/modify in steps #8 through #19.

- Scroll down and hit “Add filter” to add the next filter.
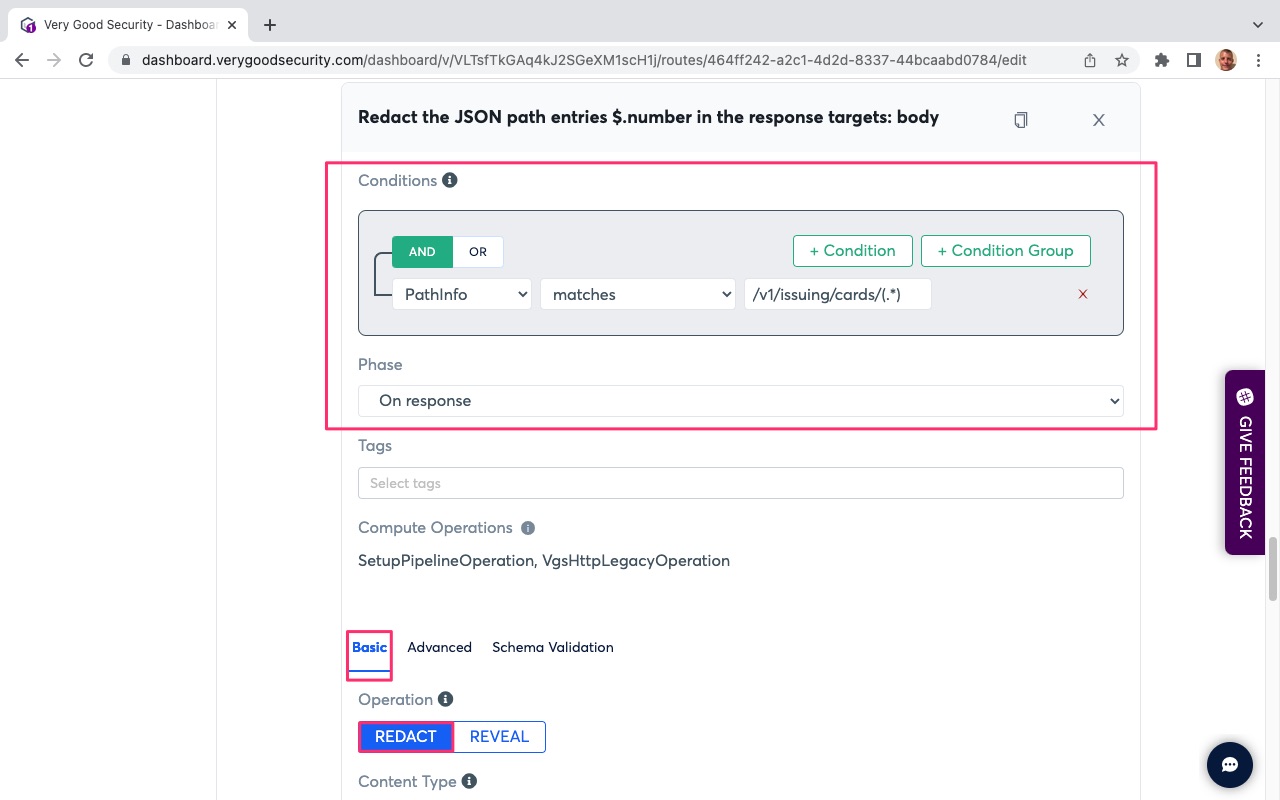
- Under “Conditions” in the default filter, set the following: * PathInfo matches “/v1/issuing/cards/(.*)”. This points to your server-side API endpoint destination.
- Phase: “On response”. This defines the API phase. In this case, this filter will trigger on API call response.
- Scroll down and select the “Basic” tab below “Tag”.
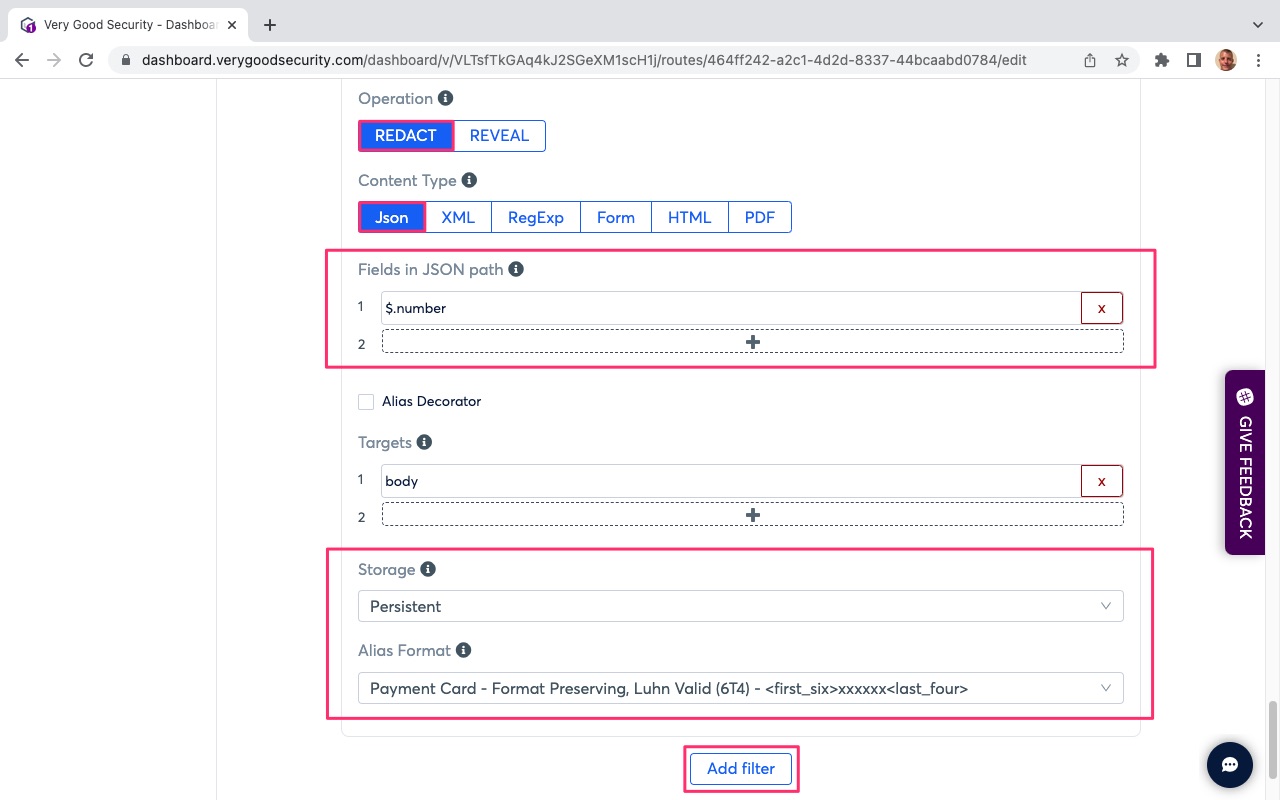
- Under “Operation”, select “REDACT” to secure the sensitive data.
- Under “Content Type, select “Json” to identify the content type of the request.
- Under “Fields in JSON path”, enter “$.number” into field 1.
- Scroll down to “Storage” below “Targets”.
- Click on “Storage” field and select “Persistent”.
- Under “Alias Format”, click the field and select “Payment Card - Format Preserving, Luhn Valid (6T4)”. .
- The following pictures highlights, with red boxes, the areas to select/modify in steps #21 through #30.
- Scroll down and hit “Add filter” to add the next filter.
- Under “Conditions” in the default filter, set an OR condition with the following settings: * PathInfo matches “/v1/issuing/cards/(.*)”. This points to your server-side API endpoint destination.
- Phase: “On response”. This defines the API phase. In this case, this filter will trigger on initial API call.
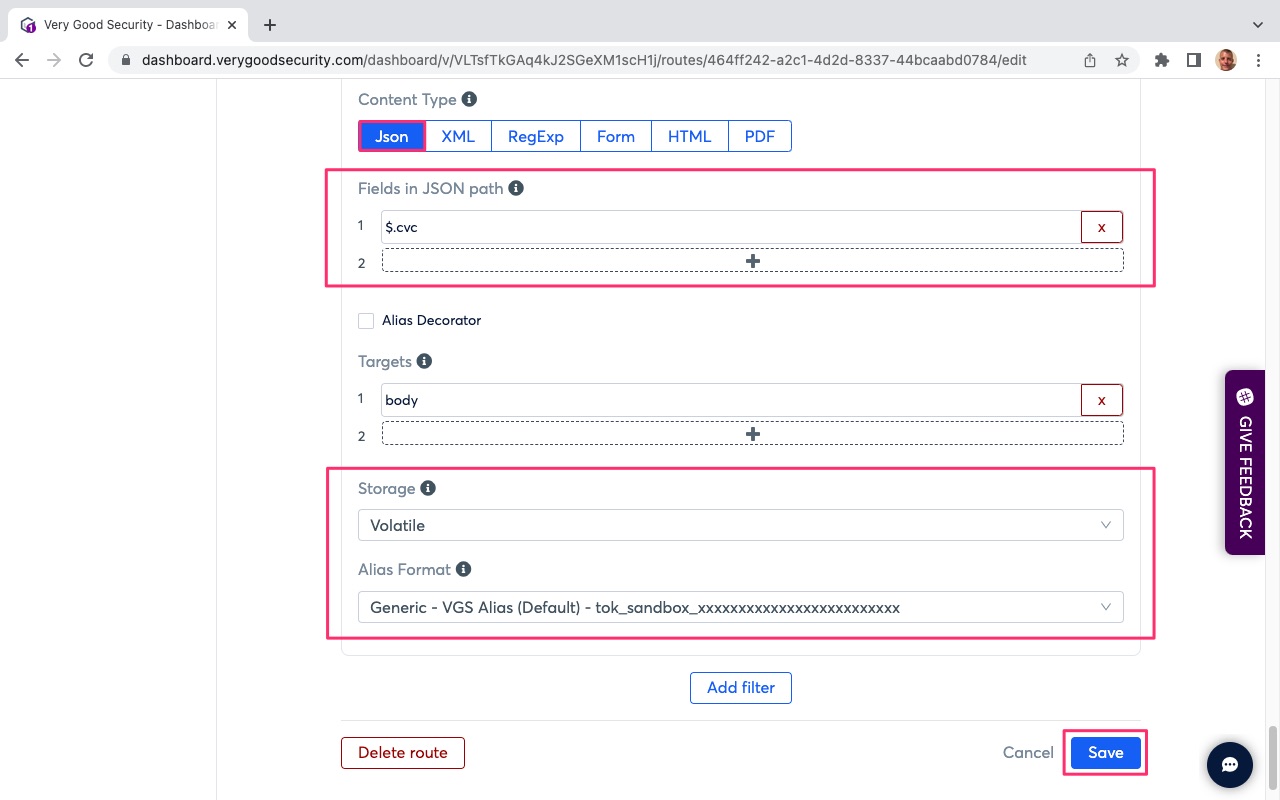
- Scroll down and select the “Basic” tab below “Tag”.
- Under “Operation”, select “REDACT” to secure the sensitive data.
- Under “Content Type, select “Json” to identify the content type of the request.
- Under “Fields in JSON path”, enter “$.cvc” into field 1.
- Scroll down to “Storage” below “Targets”.
- Click on “Storage” field and select “Volatile”.
- Under “Alias Format”, click the field and select “Generic VGS Alias (Default) - tok_sandbox_xxxxxxxxxxxxxxxxxxxxxx.
- Scroll to the bottom and hit “Save” in the bottom, right-hand side.
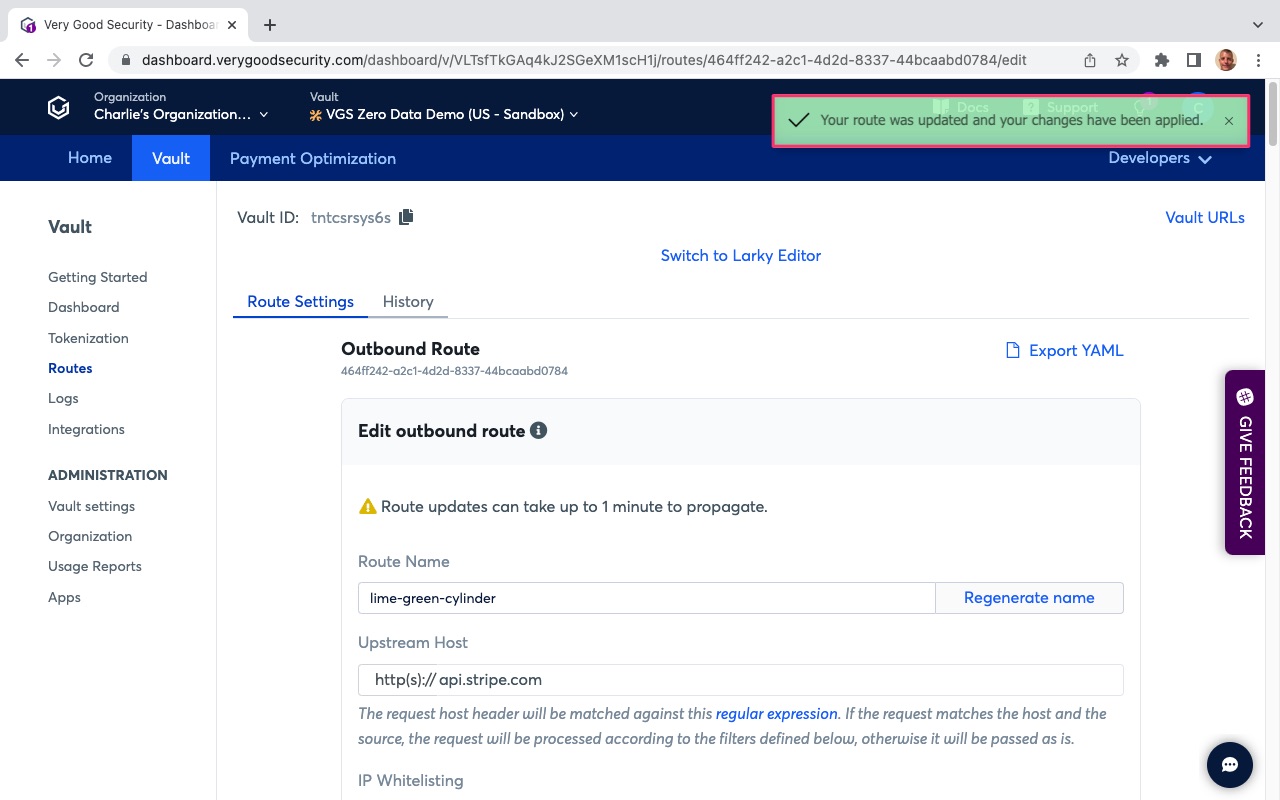
- Check for successful route update message in green.
- The following pictures highlights, with red boxes, the areas to select/modify in steps #32 through #43.

Congratulations, you have finished this section.